

Floor B1 - University Hospital
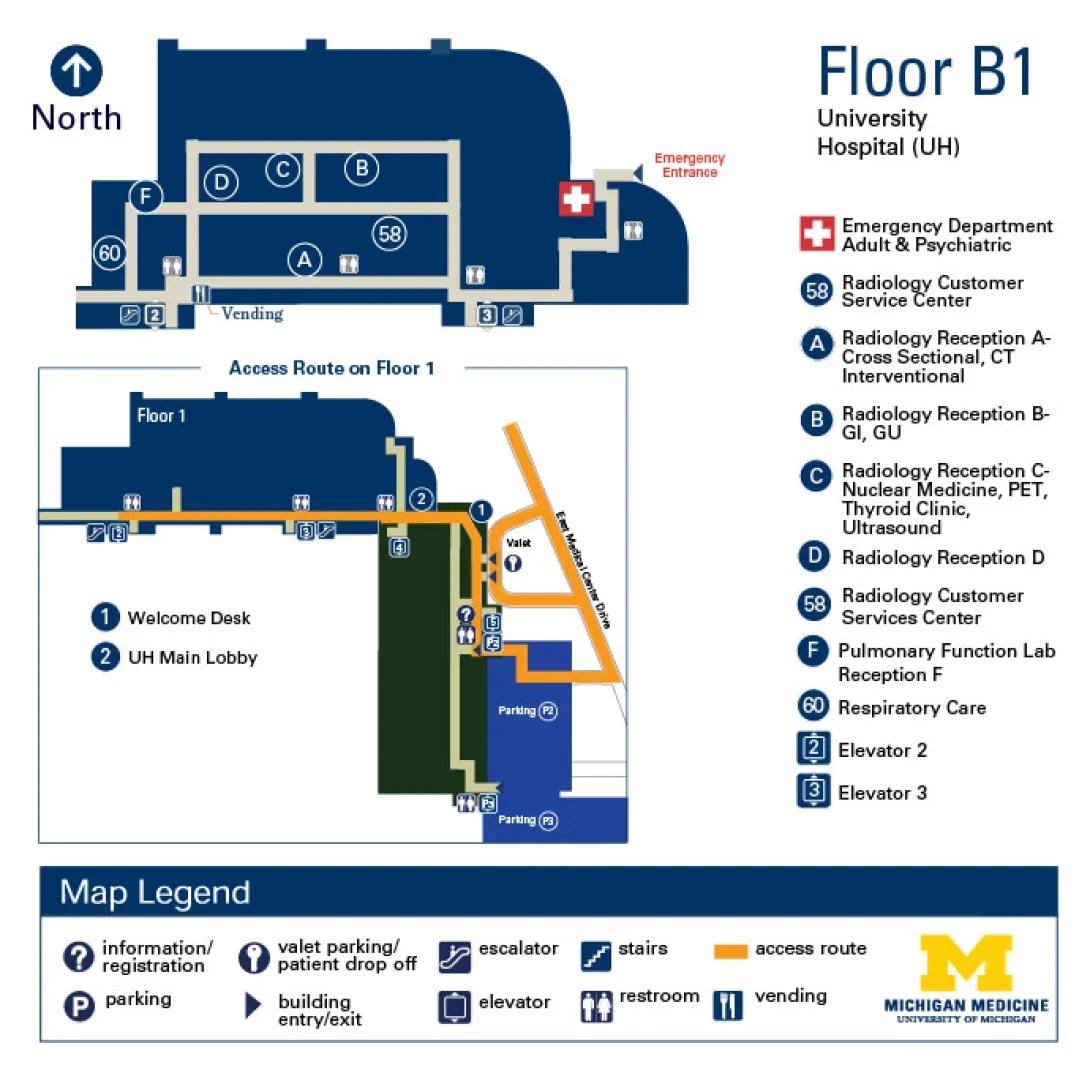
View University Hospital building details for more information including map & directions, parking, care at this location, amenities and onsite services.
Floor Map Description
Orientation and Corridor Pathways
- Compass Orientation: North is toward the top of the map, South is down, West is to the left, and East is to the right.
- Corridor Pathways: A primary hallway runs along the lower portion of Floor B1 from East to West, serving as the main spine of the floor.
Vertical Transportation Cores
- West Core (Elevator 2): Located on the far West side of the main lower hallway. It is bordered immediately to its West by an escalator symbol.
- East Core (Elevator 3): Positioned further East down the same lower hallway. It is bordered immediately to its East by another escalator symbol.
Central Layout Ring (Radiology Services)
North of the main lower corridor is a rectangular grid hallway system enclosing several diagnostic and reception destinations:
- Radiology Reception A & Service: Area A (Radiology Reception A) and Circle 58 (Radiology Customer Service Center) sit on the southern side of this inner grid loop.
- Radiology Reception B: Area B (Radiology Reception B) sits on the northeastern side of the grid.
- Radiology Reception C: Area C (Radiology Reception C) sits on the north-central side of the grid.
- Radiology Reception D: Area D (Radiology Reception D) sits on the northwestern side of the grid.
Specialized Wings and Amenities
- Western Wing (Respiratory & Pulmonary): Extending North from the far West end of the main corridor (near Elevator 2) leads to Circle 60 (Respiratory Care) and Area F (Pulmonary Function Lab Reception F) at the northwestern corner.
- Vending and Restrooms:
- Walking East from Elevator 2, a Vending area is located on the North side of the corridor, followed closely by a restroom symbol.
- A second restroom symbol is located at the corridor intersection just West of Elevator 3.
- A third restroom is located along the easternmost vertical hallway branch.
- Eastern Wing & Emergency Entrance: Heading East past Elevator 3, the corridor steps Northward, passing a restroom before splitting. Continuing East/Northeast leads to the Emergency Entrance, highlighted by a red cross symbol indicating the Emergency Department Adult & Psychiatric.
Directions to University of Michigan Hospital Floor B1
Parking for the University Hospital is in Parking Structure P2/P3.
Remember the level on which you parked.
Locate the parking structure elevator.
From P2 Parking - Take the P2 elevator to Floor 1.
- Exit the elevator and enter the Taubman Center.
- Entrance to University Hospital is at the north end of the Taubman Center.
- Follow the overhead signs to Elevator 2 or Elevator 3 as noted in the detailed directions below.
From P3 Parking - Take the P3 elevator to Floor 2.
- Exit the elevator and enter the Taubman Center.
- Entrance to University Hospital is at the north end of the Taubman Center.
- Follow the overhead signs to Elevator 2 or Elevator 3 as noted in the detailed directions below.
If you need assistance, the Welcome Desk is located on Floor 1 near the Main Entrance, or Floor 2 near the P3 Entrance.
HOPE Ambassadors (wearing yellow vests) are available to help with wayfinding.
Detailed Directions to Clinics
Detailed directions to services located on Floor B1 of the University Hospital are listed below. Look for signage to assist you in finding your location.
- Pulmonary Function Lab
Take Elevator 2 down to Floor B1. Exit the elevator and follow the signs to Pulmonary Function Lab Reception F. Pulmonary Function Lab Check-In is located at Reception F. Room B1 H274. - Respiratory Care
Take Elevator 2 down to Floor B1. Exit the elevator and follow the wall signs to Respiratory Care, located near the restrooms, Elevator 2, and Pulmonary Function Lab Reception F. - Radiology Reception A (Cross Sectional, Interventional Radiology and CT)
Take Elevator 3 down to Floor B1. Exit the elevator and follow the signs to Radiology Reception A - Radiology Reception B (Gastrointestinal (GI); Genitourinary (GU))
Take Elevator 3 down to Floor B1. Exit the elevator and follow the signs to Radiology Reception B. - Radiology Reception C (Nuclear Medicine and Ultrasound)
Take Elevator 3 down to Floor B1. Exit the elevator and follow the signs to Radiology Reception C. - Emergency (Adult emergency, psychiatric emergency)
Enter the Emergency Department from the Emergency parking area located off East Medical Center Drive. Free valet parking is available. When you enter the building, there will be a nurse/reception desk straight ahead. Please stop at the triage desk to check in or locate a patient.- From Parking Structure P2/P3, Floor 1 Main Entrance, Floor 1 UH Main Lobby: Take Elevator 4 down to Floor B1. Exit the elevator and follow the signs to Adult Emergency Services or Psychiatric Emergency Services. Please stop at the triage desk to check in or locate a patient.
- From Floor 2 UH Cafeteria: Take Elevator 3 down to Floor B1. Exit the elevator and follow the signs to Adult Emergency Services or Psychiatric Emergency Services. Please stop at the triage desk to check in or locate a patient.
