
Back to Med Inn Floor Maps

Floor 4 - Med Inn
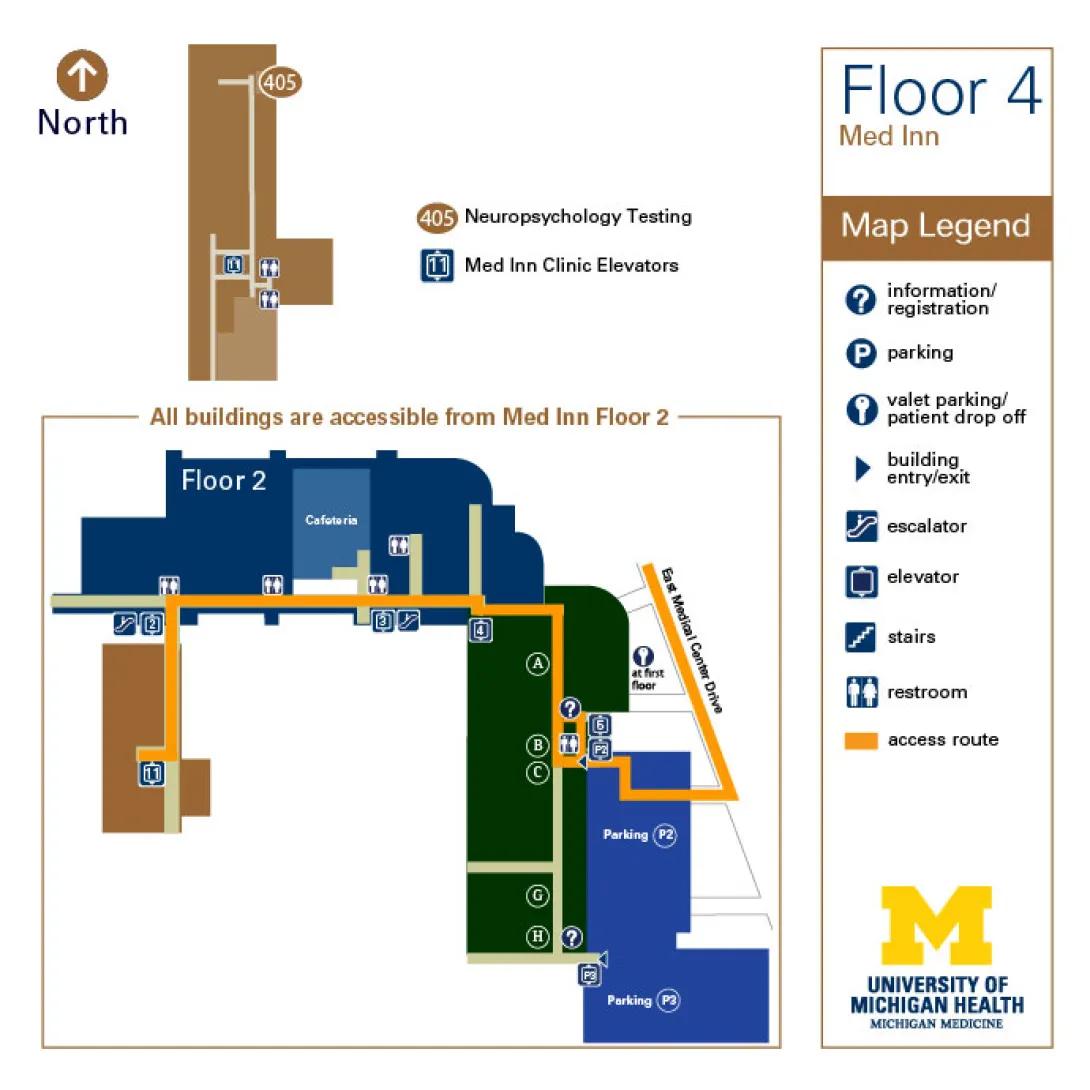
Visit Med Inn building details for more information including map & directions, parking, care at this location, amenities and onsite services.
Floor Map Description
Map Orientation & Connection Overview
- Compass Directions: North is straight up toward the top of the map, South is down toward the bottom, West is to the left, and East is to the right.
- Access Requirement: According to the text on the map, all buildings are accessible from Med Inn Floor 2.
Detailed Floor 4 Med Inn Navigation
- Layout: This area is represented by a vertical brown rectangular layout with a light gray central corridor network running North to South.
- Med Inn Clinic Elevators (11): Located centrally within a small cross-corridor intersection in the lower-middle portion of this vertical layout is a blue square enclosing the number 11.
- Restrooms: Directly east across the corridor from the elevator 11 station are two separate restroom symbols (arranged vertically, one directly north of the other).
- Neuropsychology Testing (405): Located at the absolute northernmost end of the long light gray corridor extension is the area marked 405.
Detailed Floor 2 Access Route & Floor Layout
The orange access route serves as a continuous pathway connecting several distinct colored building zones (brown, blue, dark blue, and green).
1. Far West Section (Brown Area)
- Elevator 11: At the southwestern end of the orange access route is a brown section containing a blue square with the number 11.
- Path Direction: Moving straight North out of this elevator area, the orange access route turns sharply East, passing an intersection marked with a stairs symbol and a blue square enclosing the number 2.
2. Northern Horizontal Corridor (Dark Blue "Floor 2" Area)
- As the orange route continues straight East, it forms a long horizontal line running along the southern edge of a large dark blue area labeled Floor 2.
- Restrooms: Walking East along this horizontal path, you pass two restroom symbols on your left (North) side prior to reaching the cafeteria, and a third restroom symbol on your left right after passing the cafeteria.
- Cafeteria: Situated along the north side of the path, marked as a lighter blue rectangular insert.
- Vertical Connectors: Along the south side of this horizontal path are two connectors: one marked with a blue square enclosing the number 3 accompanied by an escalator symbol, and another slightly further east marked with a blue square enclosing the number 4.
3. Central and Southern Section (Dark Green Area)
- The Turn: At the eastern end of the long horizontal section, the orange access route turns sharply South, traveling vertically through a dark green rectangular section.
- Lettered Locations: Moving South along this green path, you pass three locations on your west side in sequence: A, B, and then C. Further south in this same green section are locations G and H.
- Information and Restrooms: Near location B and C, the path encounters an information/registration symbol (?) and a restroom symbol. At the far southern end of the green section, near location H, there is another information/registration symbol (?).
4. East Section (Driveway & Parking Areas)
- Parking P2 Access: Near the central information/restroom hub (adjacent to location C), a branch of the orange access route splits off to the East. It passes a blue square enclosing the number 5 and a blue square enclosing P2 (elevator icon). The path then loops South and East around an area labeled Parking P2.
- Valet Parking & Drop-Off: North of this loop, in a white area, is a valet parking/patient drop off symbol (key icon) with the text "at first floor".
- East Medical Center Drive: The easternmost boundary of the orange access route turns North-Northwest along a path labeled East Medical Center Drive.
- Parking P3: At the absolute southern end of the layout, below the green section, is an area labeled Parking P3. It features a blue square enclosing P3 next to a building entry/exit symbol (dark blue triangle).
Directions to Floor 4 Med Inn Building
Med Inn Building Parking for Med Inn is in Parking Structure P2/P3. Remember the level on which you parked. From P2 Parking: Take the P2 elevator to Floor 1
- Exit the elevator and enter the Taubman Center
- Take Taubman Elevator 5 to Floor 2
- Follow the overhead signs toward Med Inn, Elevator 11
- Take Elevator 11 up to Floor 4*
From P3 Parking: Take the P3 elevator to Floor 2
- Exit the elevator and enter the Taubman Center
- Follow the overhead signs toward Med Inn, Elevator 11
- Take Elevator 11 up to Floor 4*
*Look for signage to assist you in finding your location.
