
Back to Med Inn Floor Maps

Floor 1 - Med Inn
Visit Med Inn building details for more information including map & directions, parking, care at this location, amenities and onsite services.
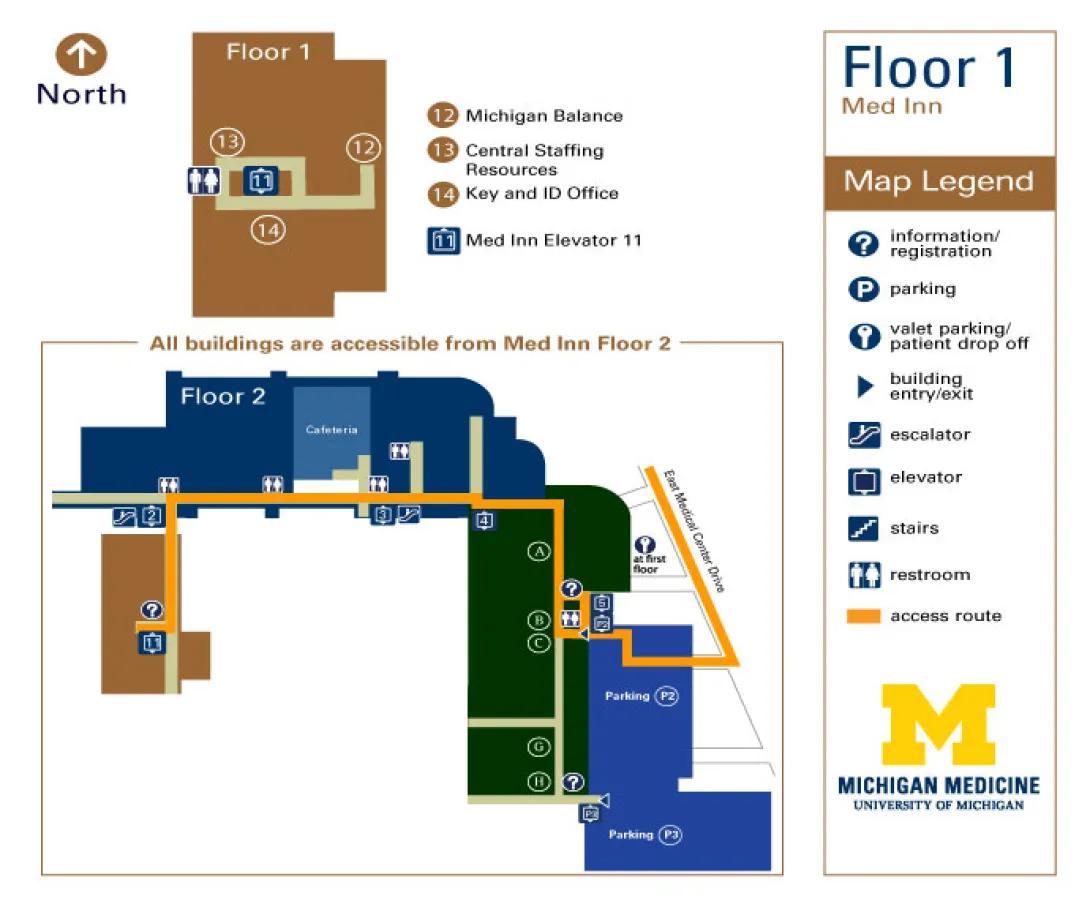
Floor Map Description
Map Orientation & Connection Overview
- Compass Directions: North is straight up toward the top of the map, South is down toward the bottom, West is to the left, and East is to the right.
- Access Requirement: According to the text on the map, all buildings are accessible from Med Inn Floor 2.
Detailed Floor 1 Navigation
- Layout: Floor 1 is represented by a light brown rectangular area containing a central, square-shaped corridor loop.
- Med Inn Elevator 11: Located centrally within the square corridor loop is a blue square enclosing the number 11.
- Restrooms: Directly west of the elevator 11 loop, on the outer western edge of the brown floor area, is a restroom symbol.
- Central Staffing Resources (13): Located in the northwest corner of the square corridor layout is the area marked 13.
- Michigan Balance (12): Located on the eastern side of the square corridor layout is the area marked 12.
- Key and ID Office (14): Located along the southern corridor branch of the square loop is the area marked 14.
Detailed Floor 2 Navigation & Access Route
The orange access route acts as a continuous pathway connecting multiple distinct colored building zones (brown, blue, dark blue, and green).
1. Far West Section (Brown Area)
- Elevator 11: At the southwestern end of the orange access route is a brown section containing a blue square with the number 11 and an information/registration symbol (?).
- Path Direction: From this point, the orange access route goes straight North a short distance, then turns sharply East, crossing past an intersection marked with a stairs symbol and a blue square enclosing the number 2.
2. Northwest Section (Dark Blue "Floor 2" Area)
- As the orange route continues straight East, it forms a long horizontal line running along the southern edge of a large dark blue area labeled Floor 2.
- Restrooms: Two restroom symbols are located directly adjacent to the north side of this horizontal path branch—one near the center-left and one further east near the cafeteria.
- Cafeteria: North of the second restroom symbol is a light blue section labeled Cafeteria.
- Vertical Connectors: Along the south side of this horizontal path are two connectors: one marked with a blue square enclosing the number 3 and a stairs symbol, and another slightly further east marked with a blue square enclosing the number 4.
3. Central and Southern Section (Dark Green Area)
- The Turn: At the eastern end of the long horizontal section, the orange access route turns sharply South, traveling vertically through a dark green rectangular section.
- Lettered Locations: Moving South along this green path, you pass three locations on your west side in sequence: A, B, and then C. Further south in this same green section are locations G and H.
- Information and Restrooms: Near location B and C, the path encounters an information/registration symbol (?) and a restroom symbol. At the far southern end of the green section, near location H, there is another information/registration symbol (?).
4. East Section (Driveway & Parking Areas)
- Parking P2 Access: Near the central information/restroom hub (adjacent to location C), a branch of the orange access route splits off to the East. It passes a blue square enclosing the number 5 and a blue square enclosing P2 (elevator icon). The path then loops South and East around an area labeled Parking P2.
- Valet Parking & Drop Off: North of this loop, in a white area, is a valet parking/patient drop off symbol (key icon) with the text "at first floor".
- East Medical Center Drive: The easternmost boundary of the orange access route turns North-Northwest along a path labeled East Medical Center Drive.
- Parking P3: At the absolute southern end of the layout, below the green section, is an area labeled Parking P3. It features a blue square enclosing P3 next to a building entry/exit symbol (dark blue triangle).
Directions to Floor 1 Med Inn Building
Parking for Med Inn is in Parking Structure P2/P3. Remember the level on which you parked.
From P2 Parking: Take the P2 elevator to Floor 1
- Exit the elevator and enter the Taubman Center
- Take Taubman Elevator 5 to Floor 2
- Follow the overhead signs toward Med Inn, Elevator 11
From P3 Parking: Take the P3 elevator to Floor 2
- Exit the elevator and enter the Taubman Center
- Follow the overhead signs toward Med Inn, Elevator 11
Take Elevator 11 down to Floor 1.
Detailed Directions to Clinics & Services
Detailed directions to services located on Floor 1 of the Med Inn Building are listed below. Look for signage to assist you in finding your location.
- Central Staffing Resources
Turn left as you exit the elevator on Floor 1 and right in the 1st hallway. Go through the door. Central Staffing Resources is located in Room C108 on your right. - Key and ID Office
Turn right as you exit the elevator on Floor 1 and right in the 1st hallway. Turn left at the next intersection. The Key and ID Office is on the right in Room C158. - Michigan Balance
Turn right as you exit the elevator on Floor 1 and turn right in the 1st hallway. Turn left at the next intersection. You will pass the Key and ID Office on the right. Turn left past the elevators on your left and follow this hallway to the end. Michigan Balance is located in Room C166A.
