Top of the pageActionset
Stress Management: Practicing Yoga to Relax
How do you do yoga to relax?
Many yoga poses may help you relax and release stress.
- The extended puppy pose and the cat-cow pose can be simple to learn. They may be a good place to start if you have never done yoga before.
- The reclining bound angle pose is more advanced. You may need to use props to get the full benefits. A prop is something you use to support different parts of your body in a yoga pose. You can use items that you have at home, such as pillows or blankets.
Extended puppy pose
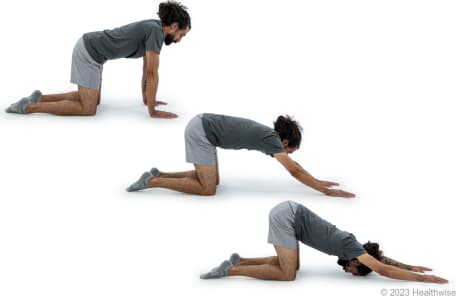
- Start on your hands and knees on a mat or carpet. Place your hands directly below your shoulders and your knees below your hips. Slowly breathe in.
- Slowly breathe out as you slowly walk your hands forward as far as you can. Keep your hips over your knees. Your arms should be pressing forward, with just your hands touching the floor.
- Drop your forehead down to the mat or carpet. Allow your chest to sag toward the floor, and relax your neck.
- Relax and breathe normally for about 1 minute. Then return to the starting position, and repeat 2 to 4 times.
Cat-cow pose
Start on your hands and knees on a mat or carpet.
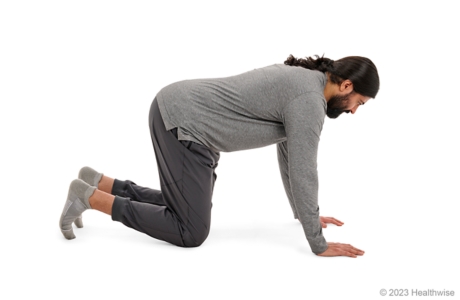
Place your wrists directly below your shoulders and your knees below your hips. Your back should be flat, and your neck should extend out straight from your spine. Your gaze should be toward the floor below.
If you have a neck problem or injury, keep your neck in the original position in line with your torso instead of moving it with your spine.
Slowly breathe out as you gently round your spine upward like a cat.
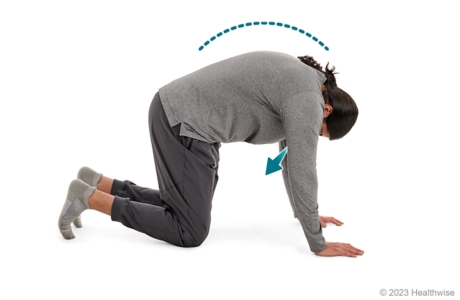
Keep your knees and shoulders in place, but allow your head to bow toward the floor. Try not to let your chin fall to your chest.
Slowly breathe in as you drop your back and belly toward the floor. At the same time, lift your chest and your "sit bones" toward the ceiling.
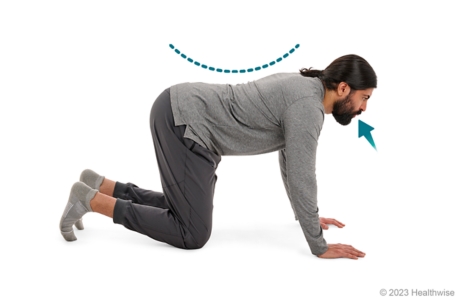
Your sit bones are the bones in your buttocks that you can feel when you sit on a hard chair. As you drop your back and lift your chest and sit bones, your belly will naturally move toward the floor. Your head comes up so that your gaze is straight in front of you (not looking upward).
Repeat these steps 10 to 20 times. Make sure to do the movements as you breathe in and out.
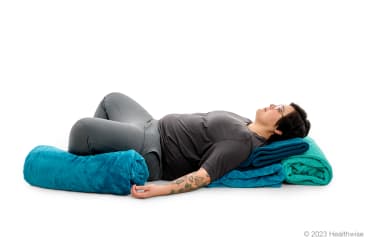
Reclining bound angle pose
Do not do this exercise after giving birth until your doctor says it is okay.
- Sit on the floor with the soles of your feet pressed together. Your knees should be bent, and your feet should be as close to your body as is comfortable without straining.
- Support your knees at the level where they are comfortable when you recline. You can place pillows or yoga blocks under your knees or use blankets. Use more than one pillow under each knee, if needed. You do not want to strain to have your knees as close to the floor as possible.
- Use blankets to support your back. Fold one or more blankets and place them lengthwise behind your back so that your torso and head will be supported when you lie down. Make sure that the folded blankets are wide enough to go under your shoulders. You may want to position the blankets so that they fit with the curve of your spine when you lie down. For example:
- Place one blanket against your buttocks.
- Put another blanket on top of it to support your lower back and spine.
- Use another blanket as a pillow to support your head.
- Sit just in front of the blankets so that when you lie back, your torso and head will be supported. You may have to test to see how many blankets to use.
- Gently lower yourself backward toward the floor. Adjust the blankets as needed. Put your hands down on the floor by your sides, a few inches away from your body. Use blankets or pillows to support your arms in a comfortable position if needed.
- Relax. Close your eyes, and breathe normally. At first, stay in the pose for up to 1 minute. Later you can stay in the pose for longer periods of time—up to 10 minutes.
Current as of: June 5, 2023
Author: Healthwise Staff
Clinical Review Board
All Healthwise education is reviewed by a team that includes physicians, nurses, advanced practitioners, registered dieticians, and other healthcare professionals.